$29.00
The File Manager Google Drive add-on provides you the ability to edit, delete, upload, download, copy and paste files and folders in Google Drive directly from your WordPress website.
Description
Integration of WP (WordPress) File Manager Google Drive Addon allows users to access your Google Drive on the website. To integrate Google Drive with the File Manager, you need to get Google Client ID and Client Secret by following the steps below:
1. Enable Google Drive addon:
Once you’ve activated the Google Drive addon, go to the “Google Drive” dropdown under the WP File Manager side menu bar. Click on the enable checkbox, then scroll down to the bottom to save changes.

2. Open Google Cloud Console:
Go to this link: https://console.cloud.google.com/projectselector2/apis
If you haven’t created a project, click “Create project” at the top of the page.

3. Enable Google Drive APIs – Right at the top, click on “ENABLE APIs AND SERVICES”
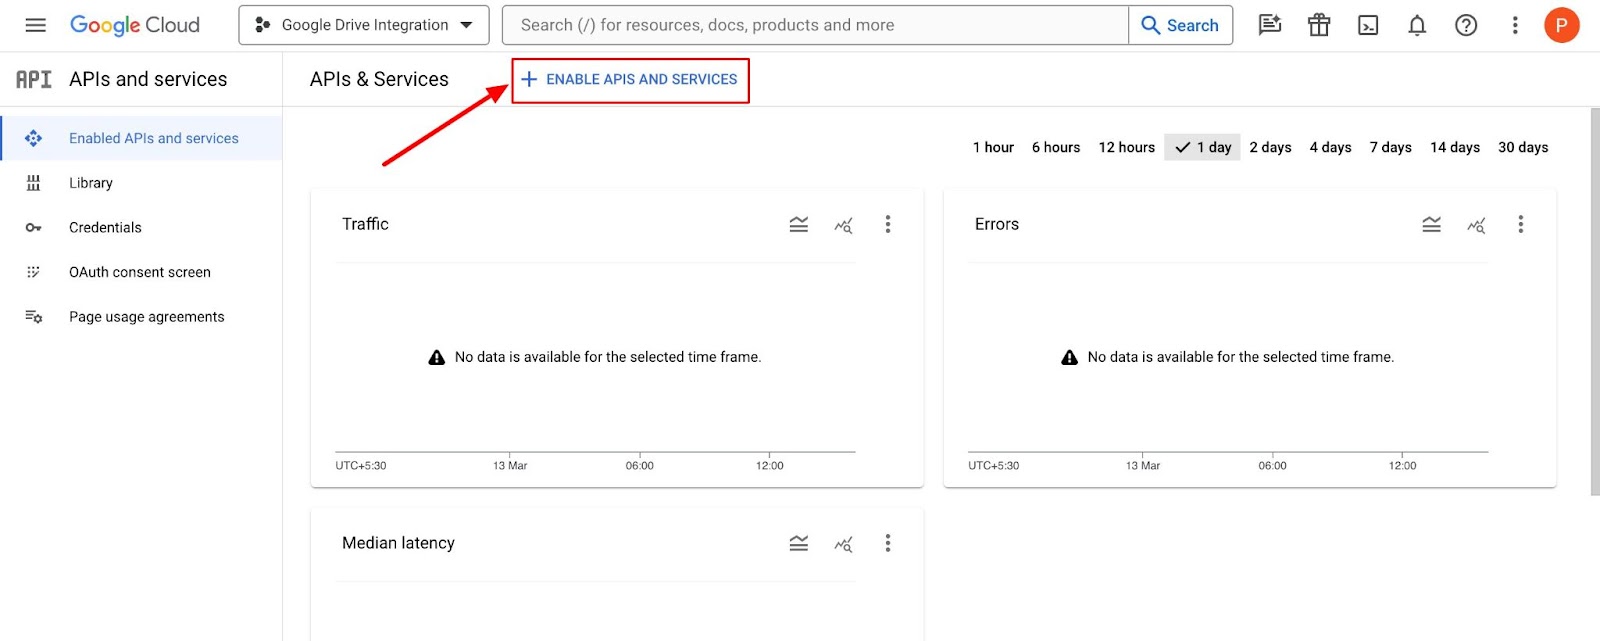
Scroll down to “Google Drive API” and enable it, then return to the dashboard.


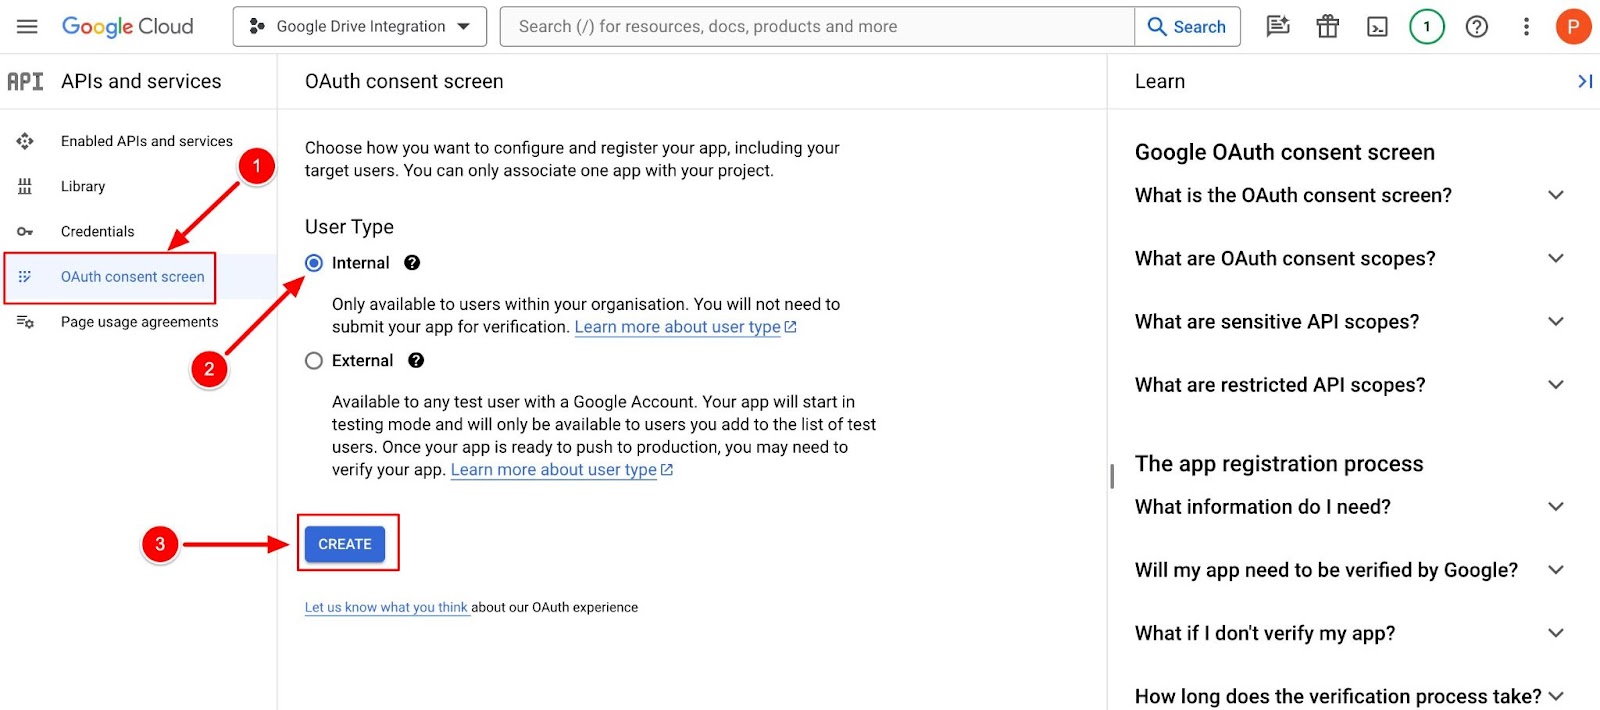
4. Set up OAuth-Consent-Screen – In the Dashboard-click on
- OAuth-Consent-Screen in the side menu
- Select User Type – Internal, Then click on (3) “Create
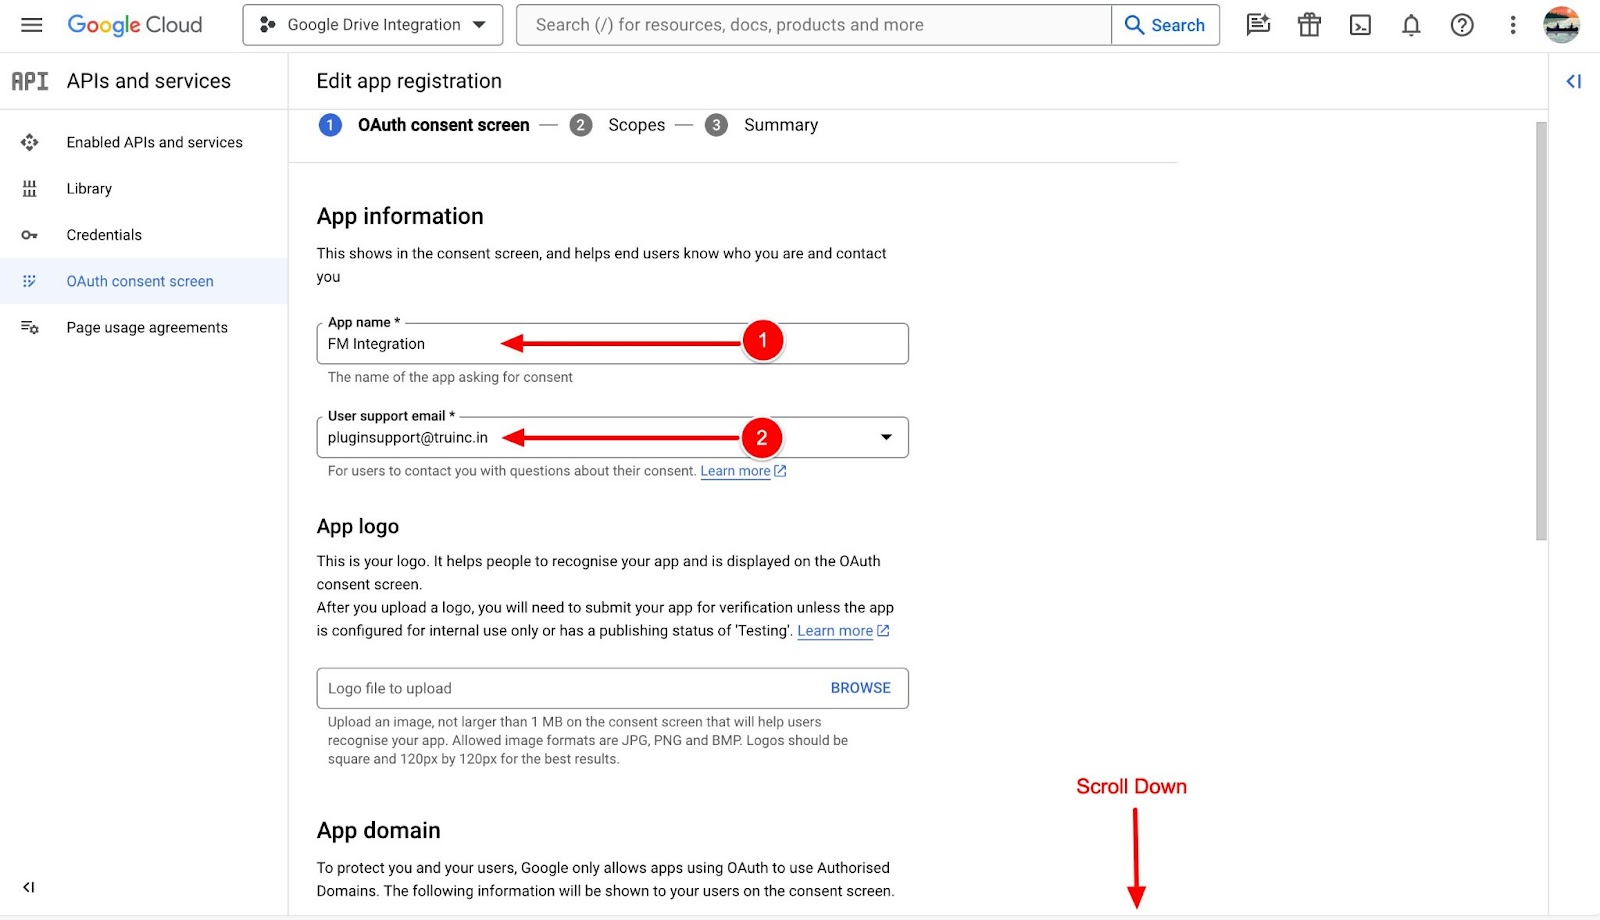
Edit App Registration-
- Choose any application’s Name,
- Use your email ID for the support email,
- Input developer email
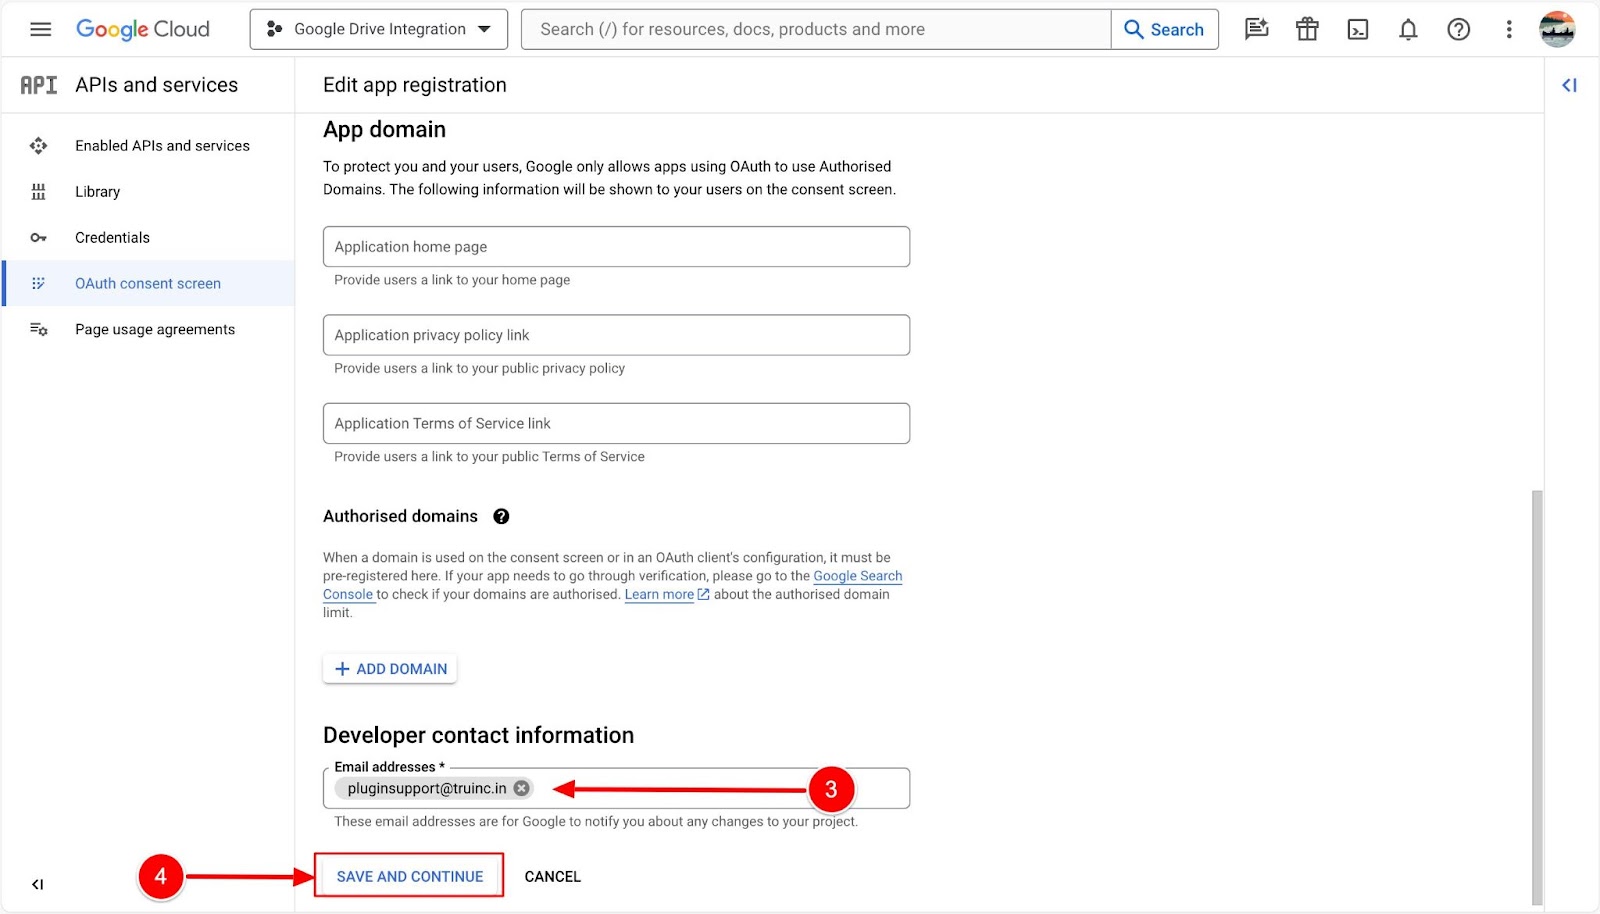
Then, click on (4) save and continue.
You don’t need to make any changes in the “Scope” section on the next page; just click on save and continue, then go back to the dashboard.
5. Create Credentials:- Click on (1) Credentials in the dashboard. Then (2) Create Credentials. Choose (3) “ OAuth Client ID” in the dropdown.
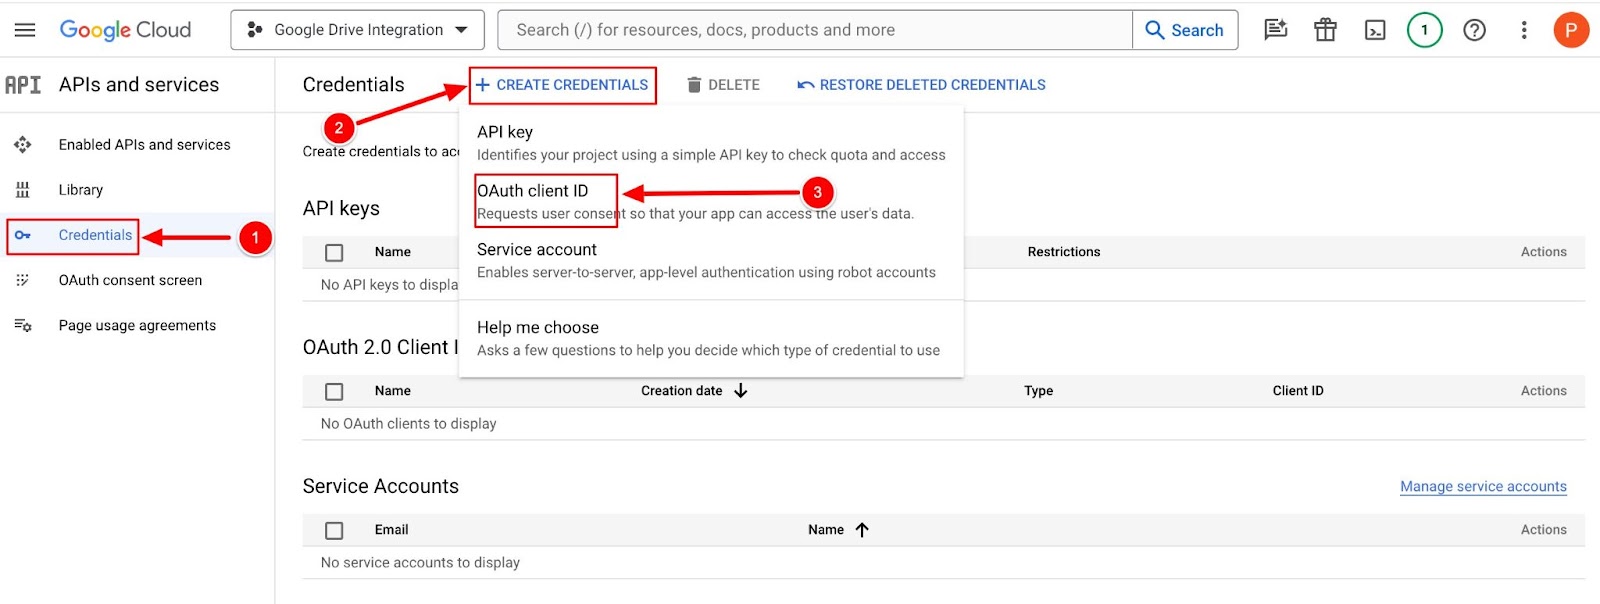
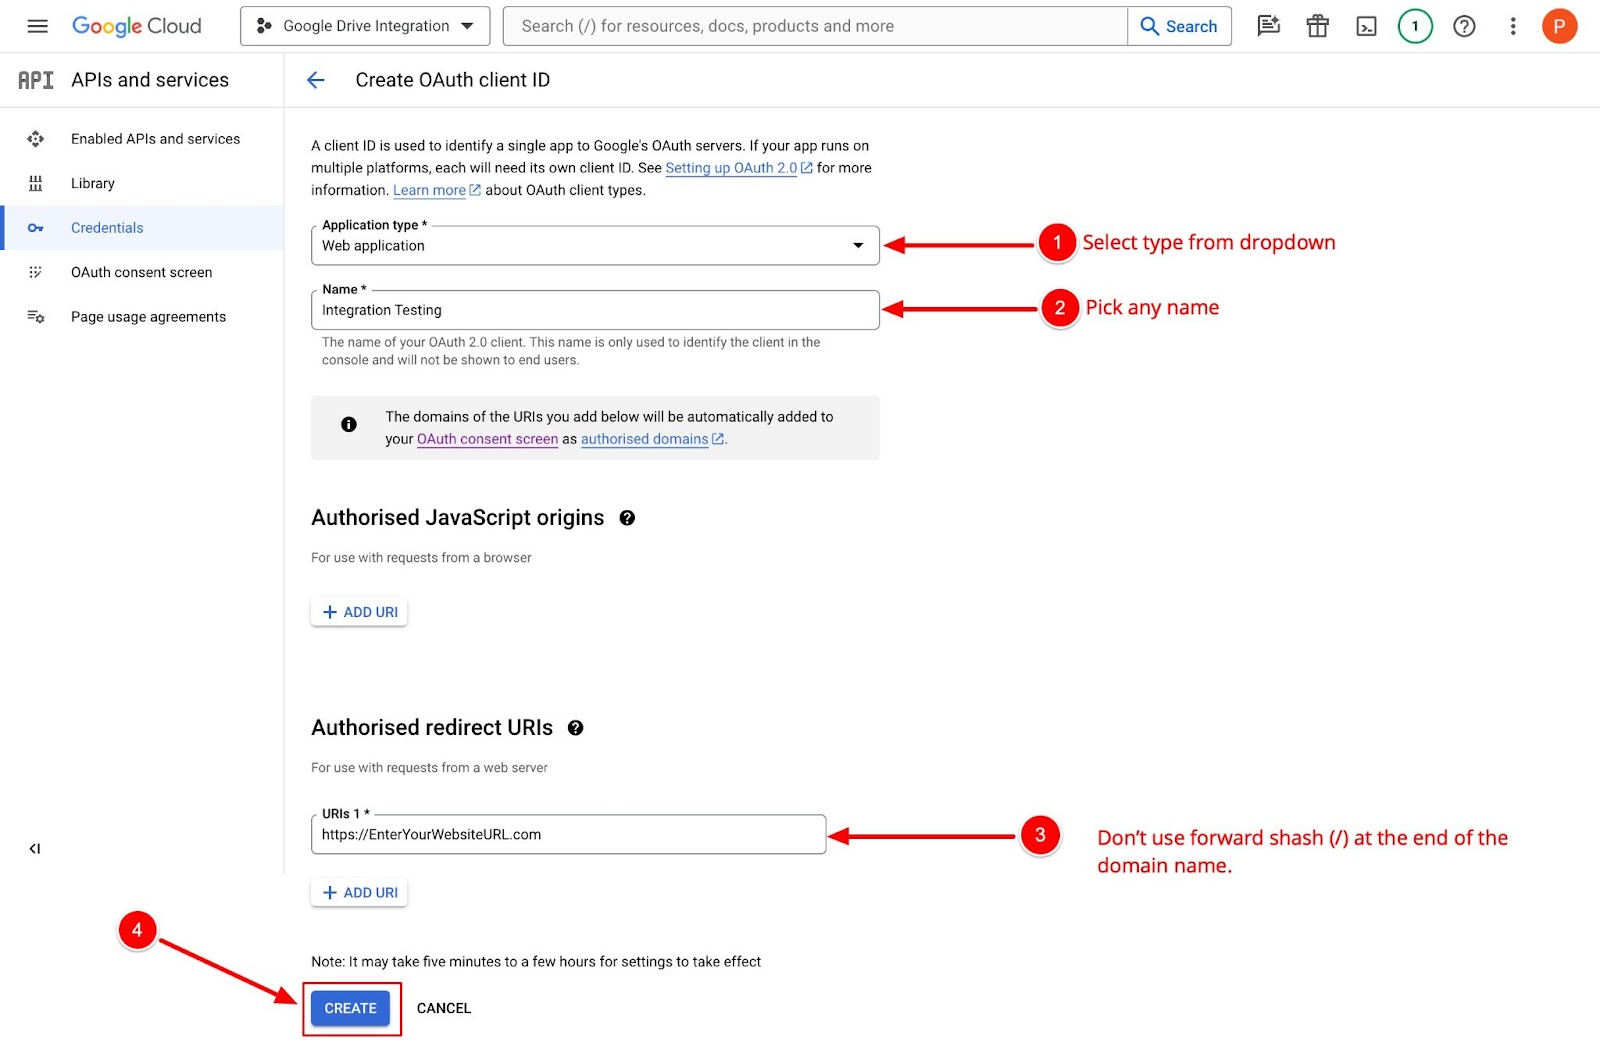
Then, Set up OAuth Client ID:-
- Select Application Type→ Web application
- Name – You can keep the default name or pick your name.
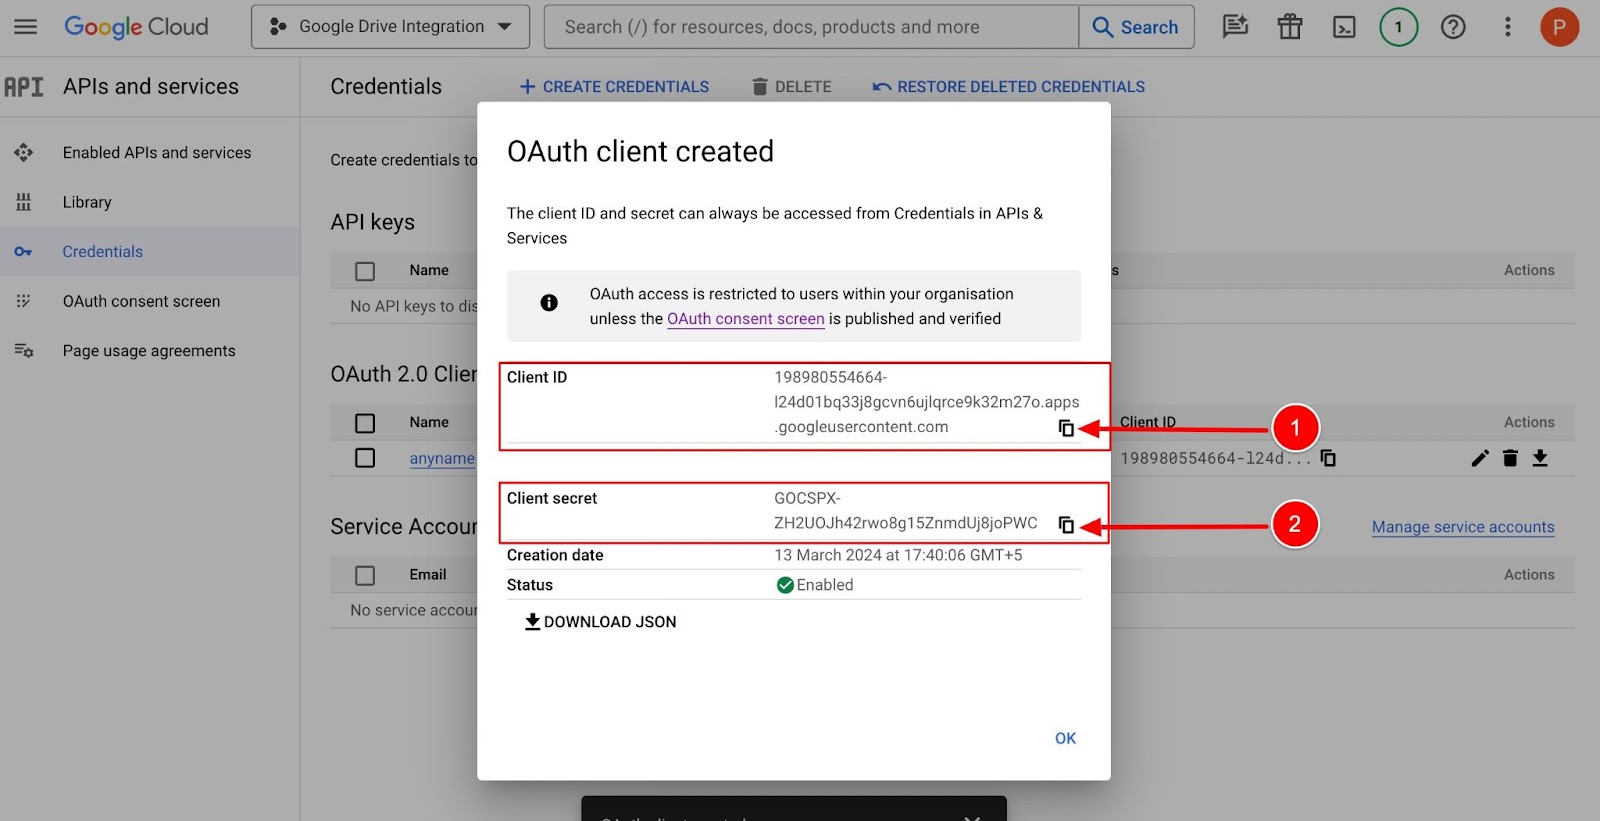
Copy (1) Client ID and (2) Client Secret: Go back to the file manager Google Drive addon section.
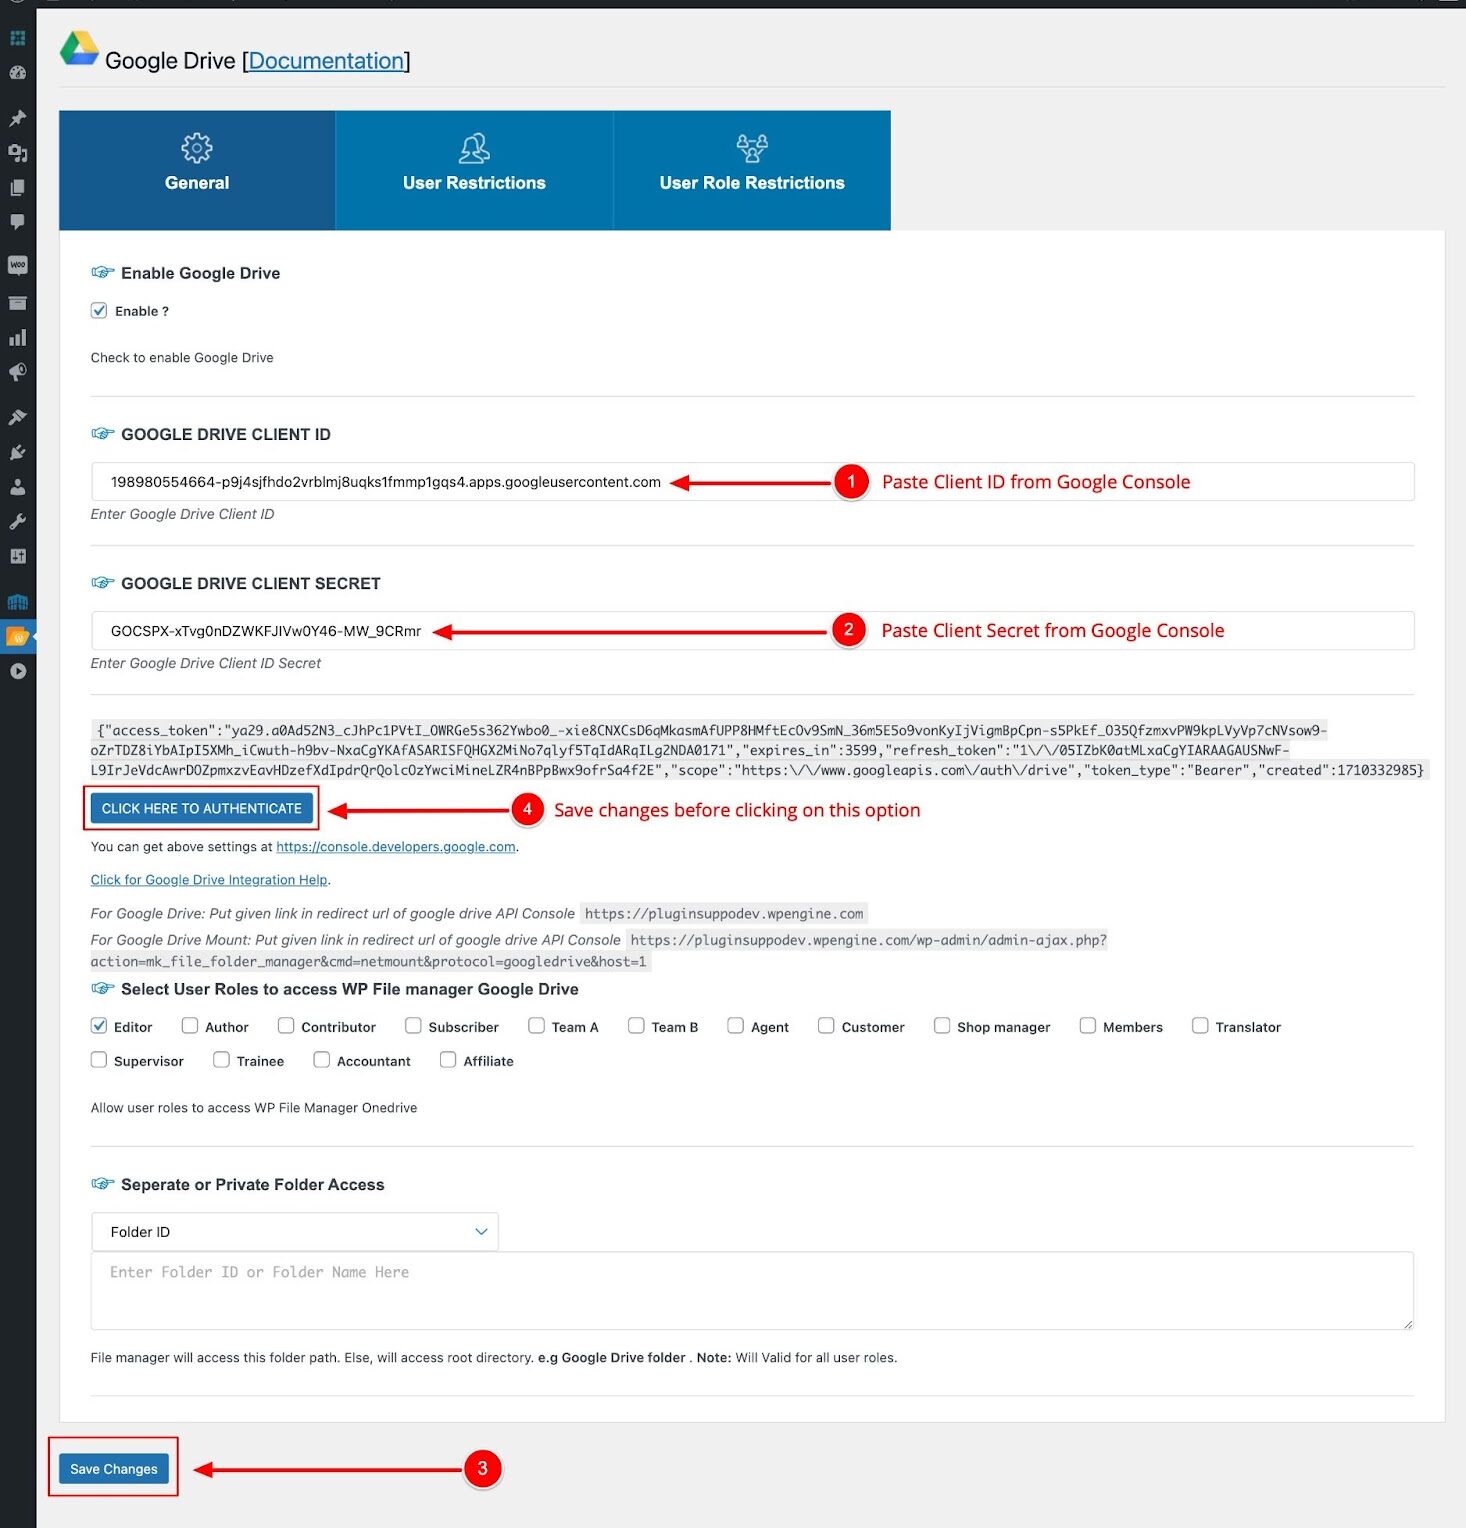
6. Authenticating Google Drive Integration:- Please paste the (1) Client ID and (2) Client Secret into the Google Drive addon section of the File Manager, as shown in the screenshot below. After that, (3) save the changes. You can then click on the (4) “CLICK HERE TO AUTHENTICATE” button to complete the authentication process.
After that, you’ll be directed to the Google verification page to grant integration consent. Once you’ve given permission, you’ll be redirected back to your site, and Google Drive will appear within WP File Manager, as shown in the screenshot below.
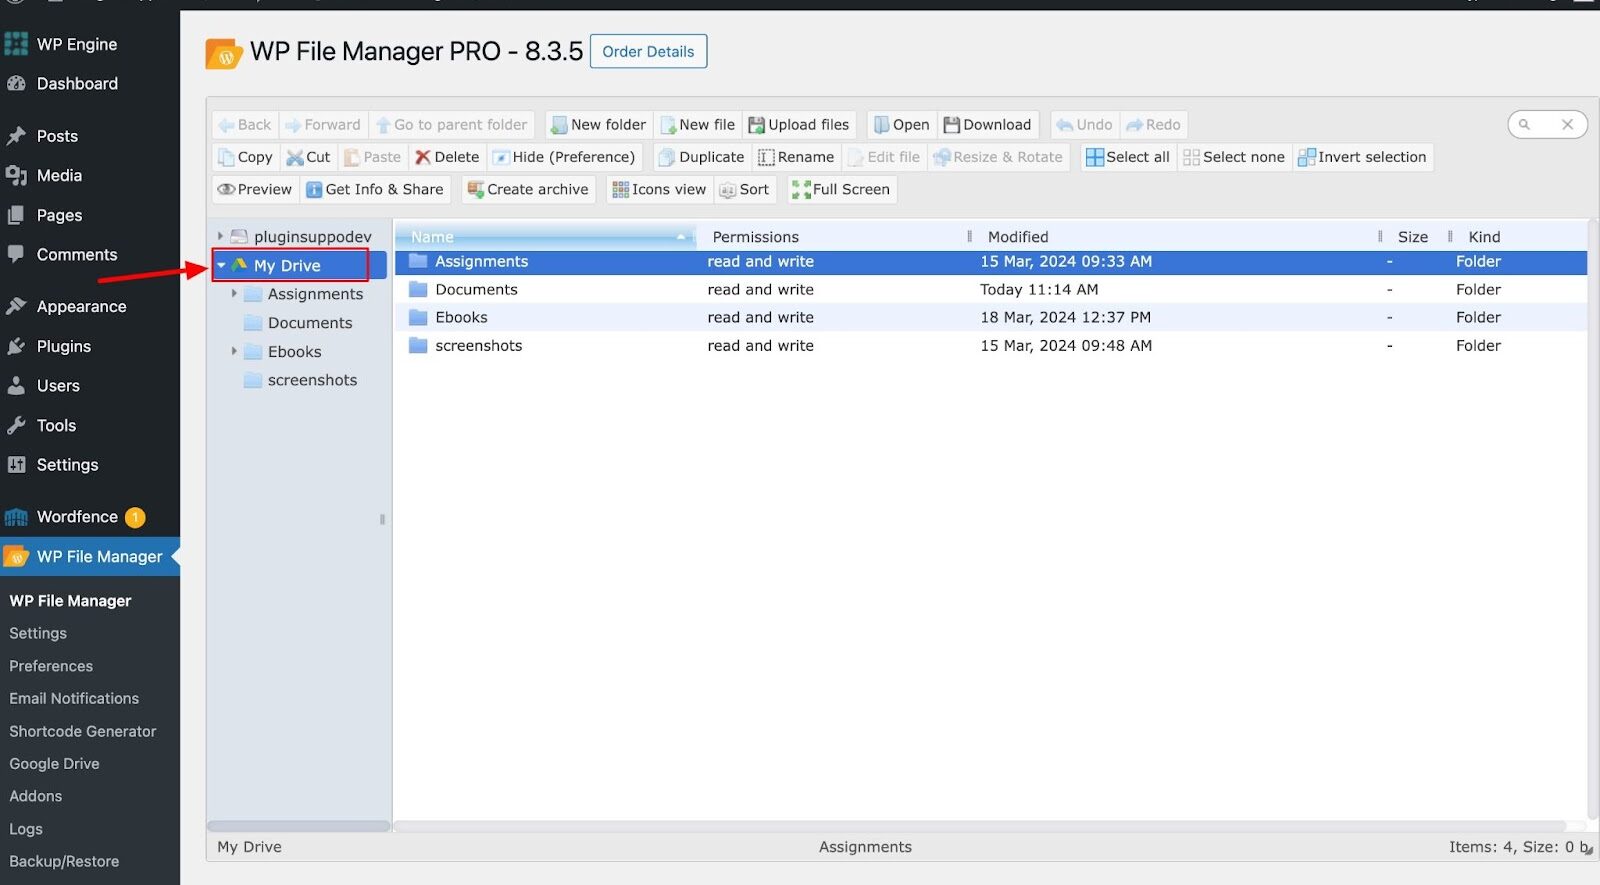
If you’re encountering errors on the authentication page, there might be a mistake in the process. Please review the steps again and ensure that everything is entered correctly.
7. The Shortcodes for the frontend:-
You can use shortcodes on website pages to display Google Drive on the user’s end (front end). Simply edit the page and insert the following shortcodes to showcase Google Drive to users.

(A) Main shortcode:
[wp_file_manager_google_drive view="list" lang="en" dateformat="d M, Y h:iA" allowed_roles="administrator,editor,author,subscriber" access_folder="*" write ="true" read="false" allowed_operations="upload, download"]
(B) You can change this shortcode as per your requirements. You can allow access to particular user roles only or ban specific users.
For example- If you wish to ban any user, then you can mention the user IDs at the end of the shortcode before closing the bracket:
ban_user_ids=”78,80″
(78, 80 are User IDs. You can change as per your requirements)
[wp_file_manager_google_drive view="list" lang="en" dateformat="d M, Y h:iA" allowed_roles="administrator,editor,author,subscriber" access_folder="*" write ="true" read="false" allowed_operations="upload, download" ban_user_ids="78,80"]
(C) Simplified shortcode:
[wp_file_manager_google_drive theme="light" write ="true" read="false" allowed_operations="upload,download"]
(D) Google Drive shortcode to give complete admin access on the front side:[wp_file_manager_google_drive_admin]
(All user role restrictions and user restrictions work with only this shortcode
(E) You can grant access to a specific folder by specifying its name in the shortcode. For instance, if you want to provide access to the “Assignments” folder in Google Drive, you just need to mention the folder’s name next to access_folder in the shortcode.
Here’s an example of how the shortcode should look:
[wp_file_manager_google_drive view="list" theme="light" lang="en" dateformat="d M, Y h:iA" allowed_roles="administrator,editor,author,subscriber" access_folder="Assignments" folder_type="name" write ="true" read="false" allowed_operations="upload, download" ban_user_ids="78,80"]
(F) Instead of the short shortcode mentioned earlier, you can also grant access to specific Google Drive folders using their unique IDs. These IDs are found in the folder URL.
Finding Folder IDs:
- Open the desired Google Drive folder in your web browser.
- Look at the URL in the address bar. Everything after “folders/” is the folder ID.
For example, in the URL “https://drive.google.com/drive/u/0/folders/1PUGuZyp25CyrWpuZHyMRwdH6aACocZIg“, the folder ID is “1PUGuZyp25CyrWpuZHyMRwdH6aACocZIg“.
Use Cases:
Suppose you want to give users access to the “Assignments” and “Ebooks” folders in your Google Drive. You can achieve this using their respective folder IDs within the shortcode.
Instead of mentioning the folder names, you would enter the comma-separated folder IDs in the shortcode
“1eTMHOaR1yggOf1s2kultPKUU7UlOx23P,1LXfhqMYQjHK5PoJsLDSJGeJRwXrCpHyw.
Here’s an example of how the shortcode should look:
[wp_file_manager_google_drive view="list" theme="light" lang="en" dateformat="d M, Y h:iA" allowed_roles="administrator,editor,author,subscriber" access_folder="1eTMHOaR1yggOf1s2kultPKUU7UlOx23P,1LXfhqMYQjHK5PoJsLDSJGeJRwXrCpHyw" folder_type="id" write ="true" read="false" allowed_operations="upload,download"]
Important Notes:-
- Once you’ve used the shortcodes, make sure to re-authenticate the plugin by clicking the “Click here to Authenticate” button to activate the changes.
- After using the shortcodes, remember to clear the website’s cache and cookies for the changes to be applied and for the folders/directories to be properly listed.
- All User restrictions and User Role restrictions work only with the admin shortcode of the Google Drive mentioned above in point (D). All changes made in the settings of the Google Drive addon will be applied to this admin shortcode.

 Supercharge File Manager Pro with the New Cloudflare R2 Addon
